

Tiling a bathroom or kitchen can transform a space, but the secret to a truly professional and long-lasting finish lies in mastering the often-overlooked steps of grouting and sealing. These crucial techniques not only elevate the aesthetics of your tiled surfaces but also provide essential protection against moisture, stains, and wear, particularly in high-traffic, moisture-prone areas like kitchens and bathrooms. This guide will walk beginners through everything they need to know to achieve a flawless, seamless tile finish.
Why Grouting and Sealing Are Non-Negotiable
Many DIY enthusiasts focus heavily on the tile laying itself, but grouting and sealing are equally, if not more, important for the longevity and appearance of your project.
- Grouting: Fills the gaps between tiles, providing structural stability, preventing dirt and debris from accumulating in the crevices, and creating a unified, finished look. It’s the visual binder that brings your tile layout together.
- Sealing: Acts as a protective barrier over the grout, making it resistant to water penetration, stains from spills, and the growth of mold and mildew. This is especially vital in wet environments like showers and kitchen backsplashes, where unsealed grout can quickly degrade and become discolored.
Neglecting these steps can lead to discolored grout, loose tiles, and even water damage to the substrate beneath your tiles, turning your beautiful renovation into a costly repair project.
Essential Tools for the Job
Before you begin, gather these tools to ensure a smooth and efficient process:
- Grout: Choose sanded grout for joints wider than 1/8 inch (3 mm) for better stability and unsanded grout for narrower joints.
- Grout Float: A rubber-soled tool designed to spread grout effectively.
- Large Sponges: For cleaning excess grout from tile surfaces.
- Two Buckets: One for mixing grout, one for clean rinse water.
- Grout Haze Remover: To tackle any stubborn residue after initial cleaning.
- Grout Sealer: Available in spray or brush-on formulas.
- Sealer Applicator: A small brush, foam brush, or spray bottle.
- Utility Knife: For cleaning out grout lines.
- Safety Glasses and Gloves: Always protect your eyes and hands.
Step 1: Meticulous Preparation is Key
A perfect finish starts with perfect preparation.
- Clean and Dry: Ensure your tiles are completely cleahttps://primeedgefze.com/n, free of dust, and thoroughly dry. Any moisture or debris can compromise grout adhesion.
- Remove Spacers: If you used tile spacers, remove them carefully once the thin-set mortar has fully cured (usually 24-48 hours; check mortar instructions).
- Clear Grout Lines: Use a utility knife or a specialized grout saw to scrape out any excess thin-set mortar that may have squeezed into the grout lines. The lines should be consistently deep and clean to allow the grout to properly fill the space.
Step 2: Mixing Your Grout to Perfection
Grout consistency is crucial for ease of application and durability.
- Follow Instructions: Always adhere strictly to the grout manufacturer’s mixing instructions.
- Achieve Peanut Butter Consistency: Gradually add water to the powdered grout, mixing thoroughly until it reaches a thick, smooth consistency, similar to peanut butter. Avoid making it too watery, which can weaken the grout, or too thick, making it difficult to work with.
- Slake Time: After initial mixing, let the grout “slake” (sit undisturbed) for 5-10 minutes. This allows the water to fully penetrate the dry ingredients. Then, remix it briefly before application.
- Work in Batches: Grout sets relatively quickly. Mix only small batches that you can comfortably apply within 20-30 minutes to prevent them from hardening in your bucket.
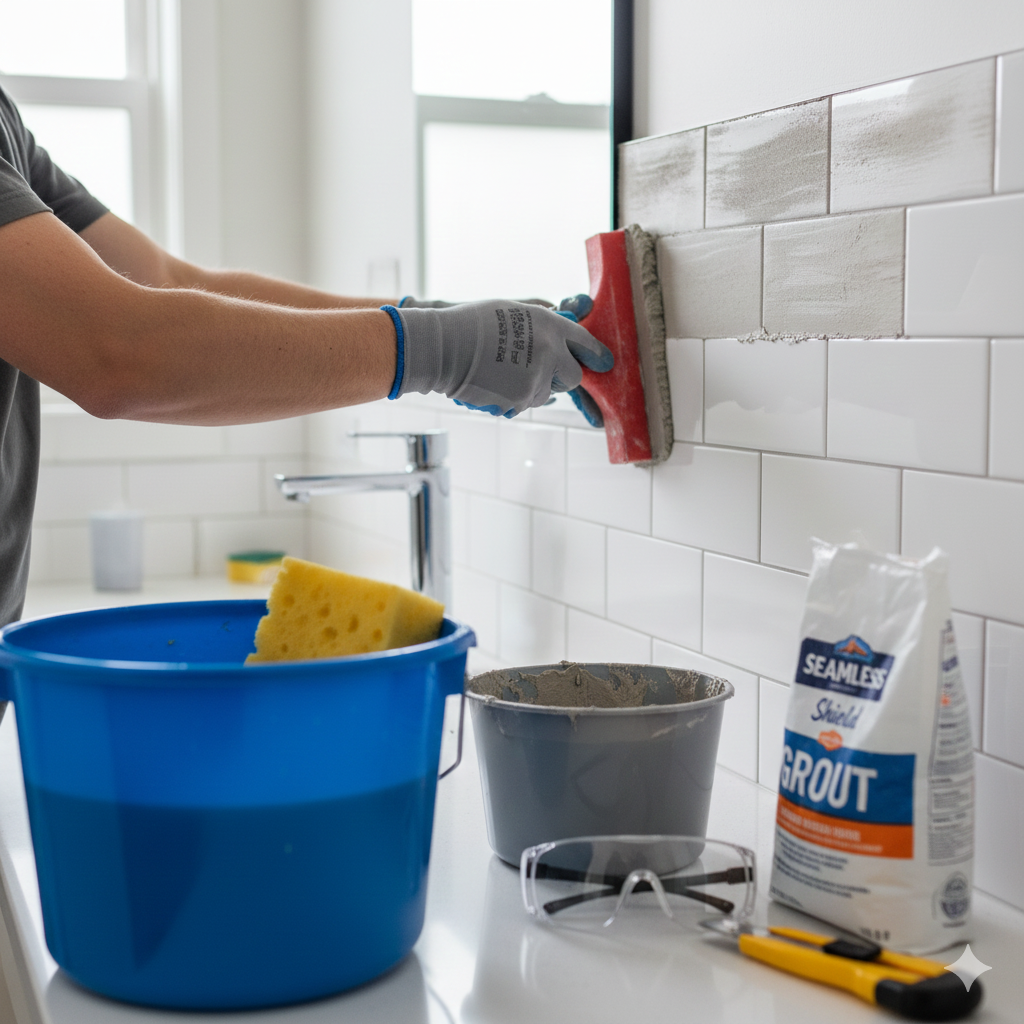
Step 3: Expert Grout Application
This is where your precision comes into play.
- Load the Float: Scoop a manageable amount of mixed grout onto your grout float.
- Spread Diagonally: Hold the float at a 45-degree angle to the tiled surface. Spread the grout firmly and diagonally across the tiles, pressing it deeply into the grout lines. The diagonal motion helps prevent the float from digging into and pulling grout out of the joints.
- Work in Sections: Grout an area of about 3×3 feet at a time. This allows you to clean up excess grout before it dries too much.
- Remove Excess: After grouting a section, hold the float at a nearly 90-degree angle and gently scrape off the majority of the excess grout from the tile faces, again moving diagonally.