
Giving old, tired furniture a second life doesn’t require a professional workshop or toxic chemicals. Chalk paint has become the gold standard for DIY enthusiasts because of its incredible adhesion, matte finish, and the ease with which it can be “distressed” to create that coveted antique, lived-in aesthetic.
Whether you found a hidden gem at a thrift store or have a dated dresser in the guest room, here is how to achieve a flawless vintage transformation.
Why Chalk Paint is the “Secret Sauce”
Unlike traditional latex or oil-based paints, chalk paint offers unique advantages for furniture flips:
- Minimal Prep: It sticks to almost any surface (wood, metal, laminate) without the need for intense sanding or priming.
- Fast Drying: You can often apply a second coat within 30–60 minutes.
- Sandability: It dries to a porous, chalky powder, making it exceptionally easy to sand away for a weathered look.
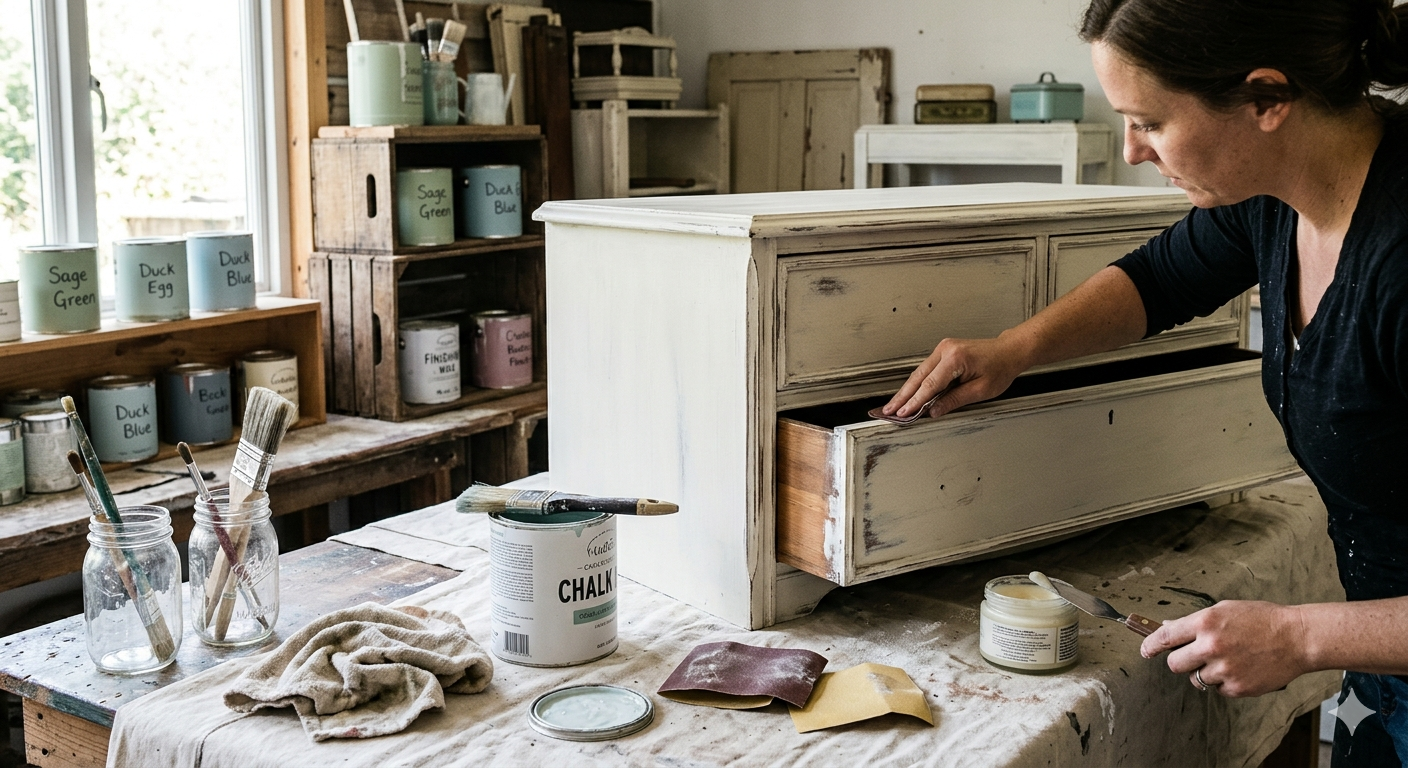
The Essential Toolkit
Before you dip your brush, gather these supplies:
- Chalk Paint: Select a primary color (and a secondary color if layering).
- Brushes: Natural bristle brushes work best for texture; foam brushes for a smoother finish.
- Sandpaper: Medium grit (150) for distressing and fine grit (220) for smoothing.
- Clear Wax or Topcoat: To seal the paint and protect the finish.
- Lint-Free Cloths: For applying wax and wiping away dust.
Step-by-Step: Creating the Vintage Masterpiece
1. Prep Without the Pain
While you don’t need to sand down to bare wood, a quick clean is vital. Wipe the piece with a damp cloth and a mild detergent to remove oils, wax, or dust. If the surface is exceptionally glossy, a light scuff-sand with 220-grit sandpaper will help the paint “bite” better.
2. The First Pass: Texture Matters
Apply your first coat of paint. If you want a rustic look, move your brush in different directions to create “peaks” and texture. If you want a cleaner look, brush with the grain of the wood.
Pro Tip: If the paint feels too thick, add a few drops of water to your container to thin it out for a smoother application.
3. Layering for Depth (Optional)
For a truly authentic antique look, consider a two-color distress:
- Paint the entire piece in a “base” color (e.g., a dark grey or warm wood tone).
- Once dry, apply a different “top” color (e.g., off-white or sage green).
- When you sand it later, the base color will peek through instead of the raw wood.
4. The Art of Distressing
This is where the magic happens. Focus your sanding on areas where natural wear would occur over decades:
- Corners and Edges: These hit walls and hands the most.
- Raised Details: Sand the high points of carvings or moldings.
- Around Handles: Mimic the wear caused by years of opening drawers.
Start light! You can always take more paint off, but putting it back on requires a brush.
5. Sealing the Story
Chalk paint is porous and will absorb stains or water if left unsealed.
- Clear Wax: Apply with a brush or cloth in small sections. It deepens the color and provides a velvety, matte protection.
- Dark Wax: Use sparingly over the clear wax to “sink” into cracks and mimic years of accumulated dust and character.
- Buffing: After the wax dries (usually 15–20 minutes), buff it with a clean cloth for a subtle sheen.
Expert Tips for a Professional Finish
- Remove Hardware: Always take off knobs and hinges before painting. It’s the difference between a “DIY project” and a “bespoke piece.”
- Work in Thin Layers: Two thin coats are always better than one thick, gloppy coat.
- The “Wet Distress” Method: If you want to avoid dust, use a damp lint-free cloth to rub away the paint while it is still slightly tacky but firm.