


A beautifully tiled bathroom backsplash or kitchen floor can instantly elevate your home’s aesthetic and value. But let’s be honest: many DIY tiling projects, while ambitious, fall short in one critical area—the finishing touches. You can buy the most expensive Moroccan zellige or classic subway tiles, but if the grouting is messy, uneven, or prone to cracking, the entire installation will look amateurish.
Furthermore, in high-moisture “wet zones” like kitchens and bathrooms—the top areas for home renovation—proper sealing is not optional; it’s essential for the structural integrity of your home.
The secret to seamless, durable, and professional-looking tile isn’t magic; it’s mastering the art of grouting and sealing. This guide will walk you through these final, crucial steps.
📸 Visualize Your Perfect Finish
Before you mix your first batch of grout, let’s visualize the goal. Imagine a pristine bathroom corner where subway tiles meet perfectly. This image captures the essence of a flawless installation.
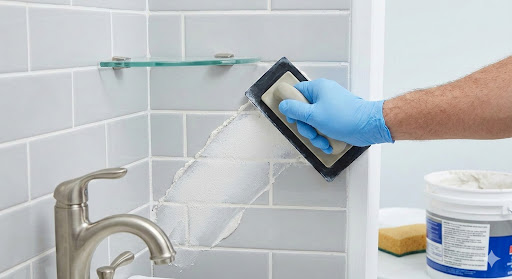
(Image: A close-up view of seamless execution. A gloved hand uses a rubber float to apply fresh grout into subway tile joints, defining the clean geometry that makes kitchen and bathroom tiling so satisfying.
Part 1: Grouting—The Art of the Perfect Fill
Grout does more than fill gaps. It bridges tiles, accommodates minor movement, and provides a crucial barrier against debris. For a beginner, the process can feel intimidating because you are working against a curing clock, but preparation is everything.
Phase A: Gathering Your Grouting Toolkit
Don’t start mixing until you have these essential tools ready:
- The Grout Itself: Choose the right type!
- Sanded Grout: For joints wider than 1/8 inch (common on floors).
- Unsanded Grout: For delicate tiles (glass, polished stone) or joints narrower than 1/8 inch (like kitchen subway backsplashes).
- Rubber Grout Float: Essential for pressing the grout deep into the joints without scratching the tiles.
- Two Large Buckets: One for mixing the grout, one for clean rinse water.
- Heavy-Duty Margin Trowel: For mixing and scooping.
- Grout Sponges: Specifically made for this task, they have rounded edges to minimize lifting grout out of the joints.
- Microfiber Cloths/Cheesecloth: For the final polishing.
- Safety Gear: Nitrile or latex gloves and safety glasses.
Phase B: The Grouting Execution Strategy
Once your tile adhesive is fully cured (usually 24–48 hours) and the joints are clean, you are ready.
- Prep the Tile: Wiping down porous tiles (like natural stone or terracotta) with a grout release or a damp sponge prevents them from absorbing moisture too quickly from the grout, which can cause cracking and color inconsistency.
- Mix to ‘Peanut Butter.’ Consistency: Add water slowly to your dry grout. Mix thoroughly. You want it smooth—thick enough to hold its shape on the float but fluid enough to press into the gaps. A runny mix is weak; a dry mix is unworkable.
- The 45-Degree Press: Load the float. Holding it at a 45-degree angle to the wall/floor, use firm pressure to press the grout diagonally across the joints. Apply grout in small, manageable sections (e.g., 3×3 feet). Work the grout back and forth until the joints are completely full.
- The 90-Degree Strike-Off: Immediately after filling, turn the float to almost 90 degrees and scrape off all excess grout from the tile face, again moving diagonally so you don’t dig the grout out of the new lines.
- Wait for the ‘Haze’: Let the grout sit for 15–30 minutes until it looks dull, or “hazy,” on the tile surface.
- The Sponge Wash: Dip your grout sponge in the clean water bucket and wring it out until it is barely damp. Wipe gently across the tiles—still moving diagonally. Do not scrub. Your goal is only to remove the haze and shape the joints. Rinse the sponge often, and change the water as soon as it gets dirty. Too much water is the beginner’s primary mistake; it dilutes the grout and weakens the bond.
- Final Polish: Once the joints are firm and the water has dried to a powdery haze, take a dry microfiber cloth or cheesecloth and gently buff the tiles to a clear shine.
Part 2: Sealing—The Invisible Guard
This is the step that guarantees your “seamless” look lasts. Grout is highly porous, especially sanded cement grout. Without a sealer, it acts like a sponge, absorbing dirty mop water, cooking grease, spaghetti sauce, and mildew-causing agents.
Why Sealing is Mandatory in Kitchens & Bathrooms
- Waterproofing: While grout fills the gaps, it doesn’t waterproof them. A sealer creates a barrier that sheds water, preventing mold growth behind the tile wall, which is critical in showers.
- Stain Resistance: In a kitchen, a robust sealer is all that stands between your new grout and a permanent wine or oil stain.
- Color Lock: Sealing protects grout from UV fading and discoloration over time.
How to Seal Like a Pro
- Wait for Full Cure: This is vital. Cement-based grout must cure completely before being sealed. This typically takes 48–72 hours, but check your specific product instructions. Sealing too early traps moisture inside and leads to sealer failure.
- Choose the Right Sealer:
- Penetrating (Impregnating) Sealers: These soak into the grout, protecting from within without changing the look. The best choice for natural stone and most standard grouts.
- Topical Sealers: These form a film on top. They often add a sheen but can wear down in high-traffic areas.
- Clean and Dry: Ensure the grout lines are impeccably clean and perfectly dry.
- Application: For a standard bathroom or backsplash, a simple grout sealer applicator bottle with a small roller wheel is often the cleanest method. For floors, you might use a sponge or brush.
- Wipe the Excess (The Most Important Step): Apply the sealer to the grout lines, letting it soak in. But here is the critical rule: Sealer must not dry on the face of the glazed ceramic tile. It will create a sticky, ugly residue. After 5–10 minutes, use a clean cloth to meticulously wipe any sealer off the tile surface.
- Second Coat (Optional but Recommended): In showers or high-stain areas, a second coat after the first has dried (check instructions) provides superior protection.
Part 3: Maintaining the “Seamless” Look
You did it! Now, to keep it looking perfect:
- Avoid Harsh Chemicals: Bleach and abrasive scrubbers will degrade and strip your sealer prematurely. Use neutral pH cleaners designed specifically for tile and grout.
- Reseal Annually: This is not a one-time job. Perform the “Water Drop Test.” Sprinkle water on a dry grout line. If it beads up, the sealer is active. If it soaks in and darkens the grout, it is time to reseal. Generally, kitchens and bathrooms need resealing every 1–2 years.
By respecting the curing times, mastering the diagonal float technique, and committing to proper sealing, your first DIY tiling project won’t just look good for a beginner—it will look absolutely seamless and professional for years to come.